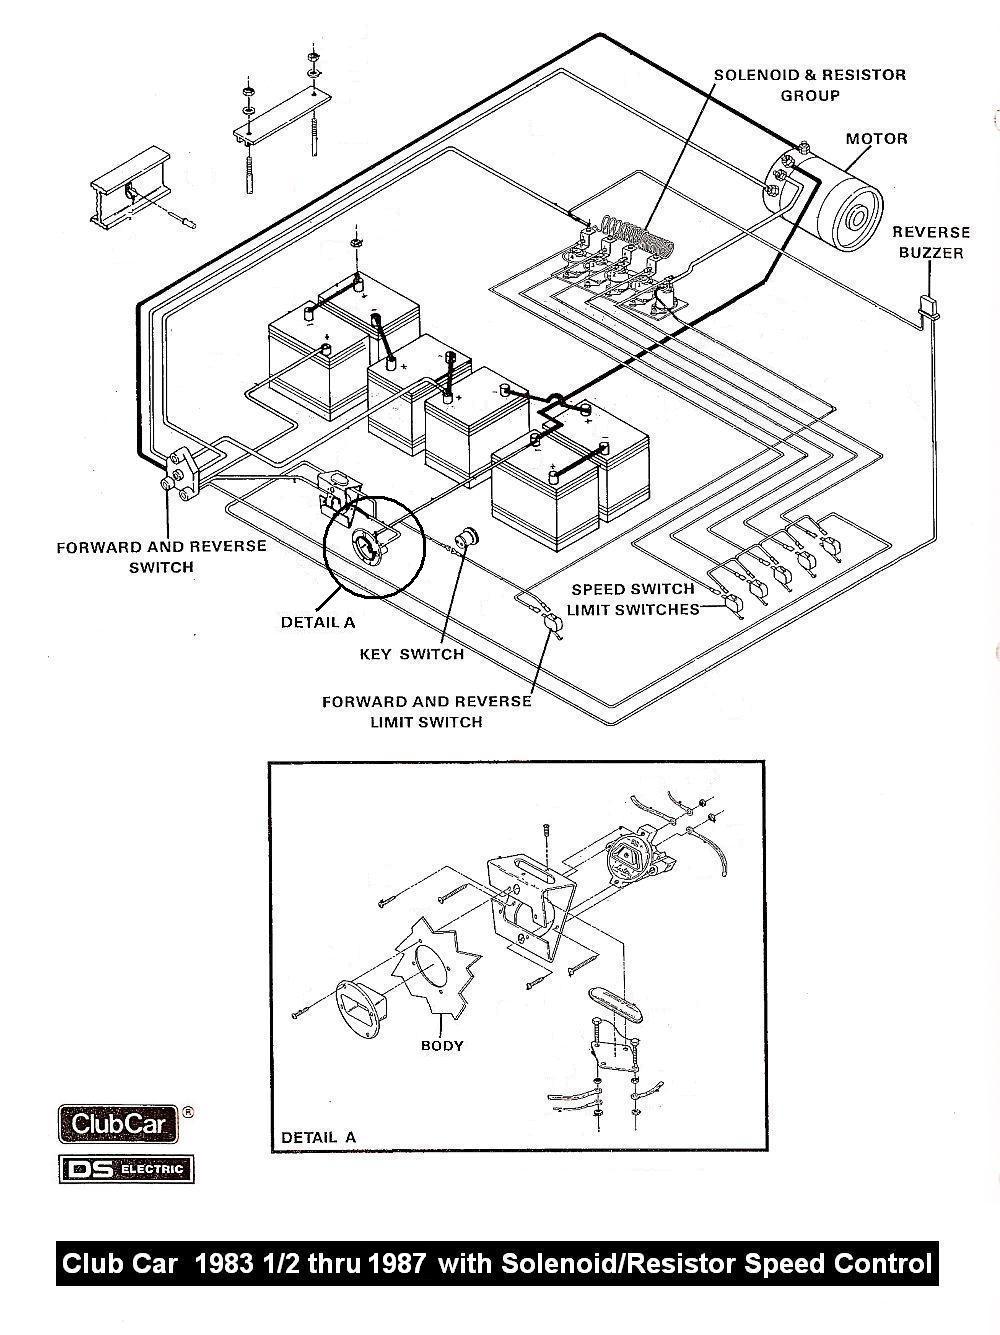
For those who are passionate about golf and the thrill of the game, a reliable and efficient golf cart is crucial to enhance their overall experience. The 1984 Club Car Golf Cart Wiring Diagram is a vital resource for anyone looking to troubleshoot or upgrade their golf cart's electrical system. This comprehensive guide provides detailed information on the wiring configuration of the 1984 Club Car model, allowing users to diagnose and fix issues efficiently. Whether you're a seasoned golfer or a DIY enthusiast, understanding the intricacies of your golf cart's electrical system can significantly improve its performance and longevity.
With the 1984 Club Car Golf Cart Wiring Diagram, you'll gain valuable insights into the electrical architecture of your golf cart. This diagram is a treasure trove of information, offering a clear visual representation of the wiring layout and connections. By following this guide, you'll be able to identify and repair electrical issues, ensuring your golf cart runs smoothly and safely. Whether you're looking to upgrade your cart's electrical system or simply want to maintain its performance, this diagram is an invaluable resource that will help you achieve your goals.
what are the key steps to troubleshoot a faulty wiring diagram for a 1984 Club Car golf cart
 To troubleshoot a faulty wiring diagram for a 1984 Club Car golf cart, the following key steps can be taken:
Identify the Symptoms: Start by understanding the specific issues you are experiencing with your golf cart. This could include problems with the electrical system, such as no spark, faulty lights, or issues with the motor. Knowing the symptoms will help you focus your troubleshooting efforts.
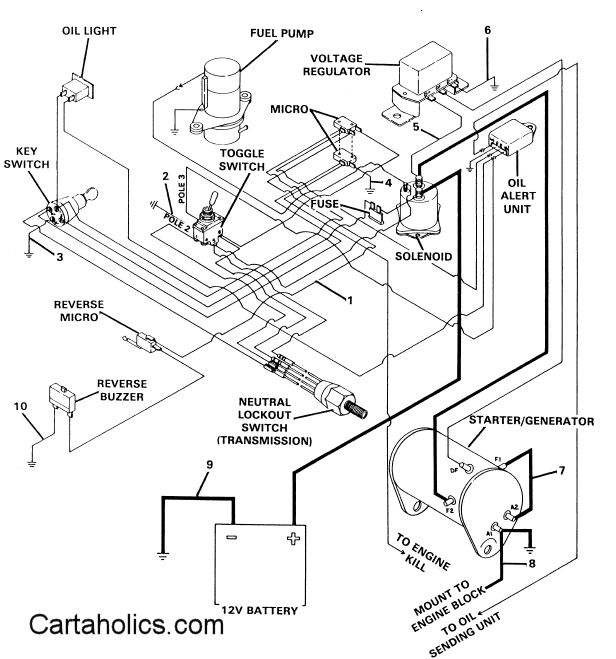
Consult the Diagram: Refer to the original wiring diagram for your 1984 Club Car golf cart. This will provide a detailed visual representation of the electrical connections and wiring layout. If you do not have the original diagram, you can try searching online for a replacement or consulting a professional mechanic.
Check for Corrosion and Damage: Inspect the wiring and electrical connections for signs of corrosion, damage, or wear. Clean or replace any damaged components to ensure proper electrical flow.
Verify Battery Connections: Ensure that the battery connections are correct and secure. In the case of the 1984 Club Car, a common issue is that batteries 2 and 3 are connected positive to positive, and batteries 5 and 6 are connected negative to negative. Verify that these connections are correct to prevent electrical issues.
Check for Loose or Faulty Connections: Inspect all electrical connections, including those to the coil, lights, and motor. Ensure that all connections are secure and not loose, which could cause electrical issues.
Consult Online Resources: If you are still experiencing issues, consult online forums and communities dedicated to golf cart maintenance and repair. These resources often provide valuable insights and troubleshooting tips from experienced mechanics and golf cart enthusiasts.
Seek Professional Help: If you are not comfortable troubleshooting the issue yourself or if the problem persists after trying the above steps, consider consulting a professional mechanic or golf cart repair service. They will have the expertise and tools to diagnose and fix the issue efficiently.
By following these steps, you should be able to effectively troubleshoot a faulty wiring diagram for your 1984 Club Car golf cart and get it running smoothly again.
To troubleshoot a faulty wiring diagram for a 1984 Club Car golf cart, the following key steps can be taken:
Identify the Symptoms: Start by understanding the specific issues you are experiencing with your golf cart. This could include problems with the electrical system, such as no spark, faulty lights, or issues with the motor. Knowing the symptoms will help you focus your troubleshooting efforts.
Consult the Diagram: Refer to the original wiring diagram for your 1984 Club Car golf cart. This will provide a detailed visual representation of the electrical connections and wiring layout. If you do not have the original diagram, you can try searching online for a replacement or consulting a professional mechanic.
Check for Corrosion and Damage: Inspect the wiring and electrical connections for signs of corrosion, damage, or wear. Clean or replace any damaged components to ensure proper electrical flow.
Verify Battery Connections: Ensure that the battery connections are correct and secure. In the case of the 1984 Club Car, a common issue is that batteries 2 and 3 are connected positive to positive, and batteries 5 and 6 are connected negative to negative. Verify that these connections are correct to prevent electrical issues.
Check for Loose or Faulty Connections: Inspect all electrical connections, including those to the coil, lights, and motor. Ensure that all connections are secure and not loose, which could cause electrical issues.
Consult Online Resources: If you are still experiencing issues, consult online forums and communities dedicated to golf cart maintenance and repair. These resources often provide valuable insights and troubleshooting tips from experienced mechanics and golf cart enthusiasts.
Seek Professional Help: If you are not comfortable troubleshooting the issue yourself or if the problem persists after trying the above steps, consider consulting a professional mechanic or golf cart repair service. They will have the expertise and tools to diagnose and fix the issue efficiently.
By following these steps, you should be able to effectively troubleshoot a faulty wiring diagram for your 1984 Club Car golf cart and get it running smoothly again.what are the most common wiring mistakes in a 1984 Club Car golf cart
 The most common wiring mistakes in a 1984 Club Car golf cart include:
Incorrect Battery Connections: Batteries 2 and 3 are connected positive to positive, and batteries 5 and 6 are connected negative to negative. This is a common issue and can cause electrical problems.
Loose or Faulty Connections: Inspect all electrical connections, including those to the coil, lights, and motor. Ensure that all connections are secure and not loose, which could cause electrical issues.
Incorrect Wiring Diagram: Refer to the original wiring diagram for your 1984 Club Car golf cart. If you do not have the original diagram, you can try searching online for a replacement or consulting a professional mechanic.
Corrosion and Damage: Inspect the wiring and electrical connections for signs of corrosion, damage, or wear. Clean or replace any damaged components to ensure proper electrical flow.
Incorrect Solenoid Installation: Ensure that the solenoid is installed correctly and wired according to the manufacturer's instructions. A faulty or incorrectly installed solenoid can cause electrical issues.
Incorrect Speed/Torque Switch Wiring: Double-check the wiring of the Speed/Torque switch, as incorrect wiring can prevent motor operation.
Incorrect Motor Wiring: Verify that the motor wiring is correct, especially if you have upgraded to a new motor. Incorrect wiring can prevent the motor from functioning properly.
By being aware of these common wiring mistakes, you can take steps to troubleshoot and prevent electrical issues in your 1984 Club Car golf cart.
The most common wiring mistakes in a 1984 Club Car golf cart include:
Incorrect Battery Connections: Batteries 2 and 3 are connected positive to positive, and batteries 5 and 6 are connected negative to negative. This is a common issue and can cause electrical problems.
Loose or Faulty Connections: Inspect all electrical connections, including those to the coil, lights, and motor. Ensure that all connections are secure and not loose, which could cause electrical issues.
Incorrect Wiring Diagram: Refer to the original wiring diagram for your 1984 Club Car golf cart. If you do not have the original diagram, you can try searching online for a replacement or consulting a professional mechanic.
Corrosion and Damage: Inspect the wiring and electrical connections for signs of corrosion, damage, or wear. Clean or replace any damaged components to ensure proper electrical flow.
Incorrect Solenoid Installation: Ensure that the solenoid is installed correctly and wired according to the manufacturer's instructions. A faulty or incorrectly installed solenoid can cause electrical issues.
Incorrect Speed/Torque Switch Wiring: Double-check the wiring of the Speed/Torque switch, as incorrect wiring can prevent motor operation.
Incorrect Motor Wiring: Verify that the motor wiring is correct, especially if you have upgraded to a new motor. Incorrect wiring can prevent the motor from functioning properly.
By being aware of these common wiring mistakes, you can take steps to troubleshoot and prevent electrical issues in your 1984 Club Car golf cart.what are the symptoms of a wiring mistake in a 1984 Club Car golf cart
The symptoms of a wiring mistake in a 1984 Club Car golf cart can include: No Motor Operation: If the wiring is incorrect, the motor may not function at all, even if the batteries are fully charged. Solenoids Clicking but No Motor Operation: In cases where the wiring is incorrect, the solenoids may click but the motor will not turn, indicating a problem with the electrical flow. Faulty or No Lights: Incorrect wiring can also cause issues with the lights on the golf cart, such as no illumination or flickering. Battery Drain: If the wiring is damaged or corroded, it can cause the batteries to drain faster than usual, leading to reduced performance or even complete failure. Unusual Noises or Vibrations: Incorrect wiring can also cause unusual noises or vibrations from the motor or other components, indicating a problem with the electrical flow. Difficulty Starting the Cart: If the wiring is incorrect, the cart may not start at all or may be difficult to start, especially if the batteries are fully charged. These symptoms can be indicative of a wiring mistake in a 1984 Club Car golf cart, and it is essential to identify and correct the issue to ensure proper functioning of the cart. #EANF#As you conclude your journey through the intricacies of the 1984 Club Car Golf Cart Wiring Diagram, we hope you have gained valuable insights into the electrical system of your golf cart. This comprehensive guide has walked you through the essential steps to troubleshoot and maintain your golf cart's wiring, ensuring a smooth and enjoyable ride on the course. Whether you are a seasoned golfer or a DIY enthusiast, understanding the intricacies of your golf cart's electrical system is crucial to maximizing its performance and longevity. By following the guidelines outlined in this article, you will be well-equipped to tackle any electrical issues that may arise, ensuring your golf cart remains a reliable companion for years to come.
Before you part ways, we would like to emphasize the importance of staying vigilant about the electrical health of your golf cart. Regular maintenance and inspections can go a long way in preventing costly repairs and ensuring your safety on the course. Remember, a well-maintained golf cart is not only more enjoyable to operate but also a safer and more reliable mode of transportation. As you continue to explore the world of golf cart maintenance, we encourage you to stay informed about the latest developments and best practices in the field. With the 1984 Club Car Golf Cart Wiring Diagram as your trusted guide, you will be well on your way to becoming a golf cart maintenance expert. Happy golfing!


No comments:
Post a Comment