When it comes to understanding the intricacies of a 14-pin Mercury control box wiring, it's crucial to grasp the fundamental principles that govern its operation. This article aims to provide a comprehensive guide for those seeking to navigate the complexities of this crucial component in their vehicle's electrical system. By delving into the details of the wiring configuration and its role in controlling various functions, readers will gain a deeper appreciation for the importance of proper installation and maintenance.
Mercury control boxes are a vital component in many vehicles, particularly those with advanced electrical systems. The 14-pin variant is particularly common, and understanding its wiring configuration is essential for ensuring optimal performance and preventing potential issues. In this article, we will explore the wiring diagram and its various components, providing a step-by-step guide for those looking to troubleshoot or repair their vehicle's electrical system. By the end of this article, readers will have a solid grasp of the 14-pin Mercury control box wiring and be equipped to tackle any challenges that may arise.
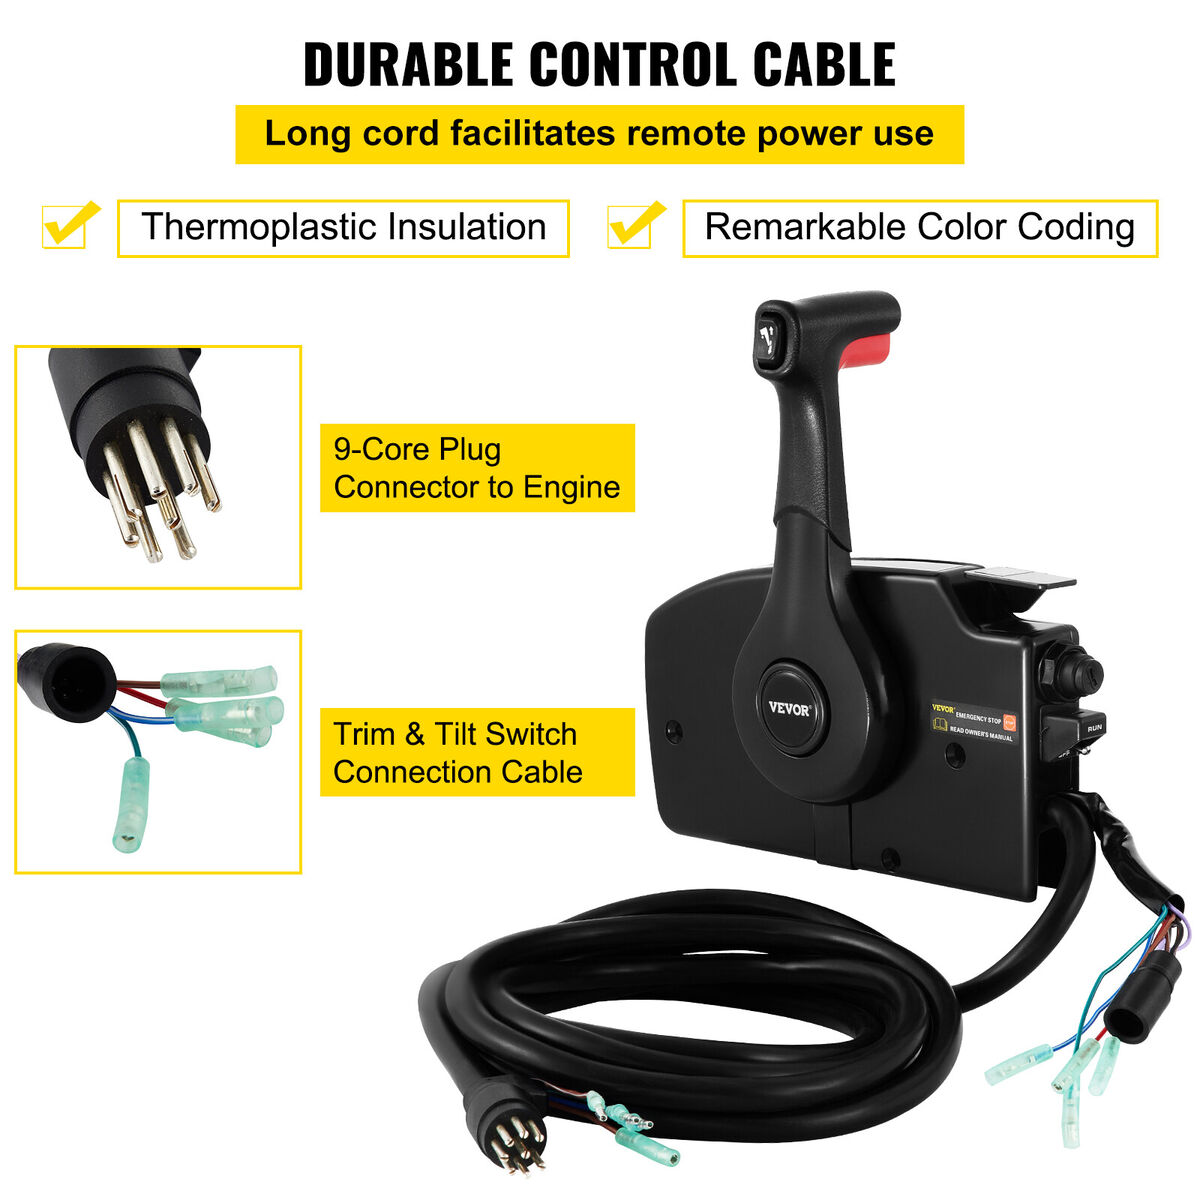
how to wire a pin mercury control box
 To wire a 14-pin Mercury control box, it's essential to understand the specific wiring configuration and its role in controlling various functions of your vehicle's electrical system. The 14-pin Mercury control box is a crucial component in many boats, particularly those with advanced electrical systems. Here's a step-by-step guide to help you navigate the wiring diagram and troubleshoot any issues that may arise:
Identify the Wiring Diagram: Start by locating the wiring diagram for your specific Mercury control box model. This diagram will outline the connections between the control box and other components in your boat's electrical system.
Pin Identification: The 14-pin Mercury control box has specific pins that correspond to different functions. These functions include ignition, starter, tilt, trim, and others. Identify each pin and its corresponding function to ensure proper wiring.
Wiring Connections: Connect the wires to the corresponding pins on the control box. Make sure to match the wire colors to the pin functions as outlined in the wiring diagram. Use wire connectors or spade terminals to secure the connections.
Verify Functionality: Once all connections are made, test the control box to ensure it's functioning correctly. Check for proper ignition, starter engagement, and tilt and trim operation.
Troubleshooting: If you encounter issues with the control box, refer to the wiring diagram and check for any loose connections or damaged wires. Consult a professional mechanic if you're unsure about any part of the process.
Remember to always follow proper safety precautions when working with electrical systems, and consult the manufacturer's instructions for specific guidance on wiring your 14-pin Mercury control box.
To wire a 14-pin Mercury control box, it's essential to understand the specific wiring configuration and its role in controlling various functions of your vehicle's electrical system. The 14-pin Mercury control box is a crucial component in many boats, particularly those with advanced electrical systems. Here's a step-by-step guide to help you navigate the wiring diagram and troubleshoot any issues that may arise:
Identify the Wiring Diagram: Start by locating the wiring diagram for your specific Mercury control box model. This diagram will outline the connections between the control box and other components in your boat's electrical system.
Pin Identification: The 14-pin Mercury control box has specific pins that correspond to different functions. These functions include ignition, starter, tilt, trim, and others. Identify each pin and its corresponding function to ensure proper wiring.
Wiring Connections: Connect the wires to the corresponding pins on the control box. Make sure to match the wire colors to the pin functions as outlined in the wiring diagram. Use wire connectors or spade terminals to secure the connections.
Verify Functionality: Once all connections are made, test the control box to ensure it's functioning correctly. Check for proper ignition, starter engagement, and tilt and trim operation.
Troubleshooting: If you encounter issues with the control box, refer to the wiring diagram and check for any loose connections or damaged wires. Consult a professional mechanic if you're unsure about any part of the process.
Remember to always follow proper safety precautions when working with electrical systems, and consult the manufacturer's instructions for specific guidance on wiring your 14-pin Mercury control box.what tools are needed to wire a pin mercury control box
 To wire a 14-pin Mercury control box, you will need the following tools:
Wiring Diagram: A detailed wiring diagram specific to your Mercury control box model is essential for understanding the connections between the control box and other components in your boat's electrical system.
Wire Connectors or Spade Terminals: These are used to secure the connections between the wires and the control box. Ensure that the connectors or terminals match the wire sizes and are compatible with the control box's pin configuration.
Wire Strippers: These are used to strip the insulation from the ends of the wires, exposing the conductors for connection.
Multimeter (Optional): A multimeter can be useful for testing the electrical connections and ensuring that the wiring is correct.
Pliers or Wire Pliers: These are used to bend and shape the wires as needed during the installation process.
Tape or Cable Ties: These are used to secure the wiring harnesses and prevent them from getting damaged or tangled.
Safety Goggles and Gloves: These are essential for protecting yourself from electrical shock and other hazards while working with electrical systems.
A Clean and Well-Lit Workspace: A clean and well-lit workspace is crucial for ensuring that you can see and work on the wiring connections accurately.
A Mercury Control Box Manual (Optional): Having a manual specific to your Mercury control box model can be helpful in understanding the specific wiring configuration and troubleshooting any issues that may arise.
Professional Assistance (Optional): If you are not comfortable with electrical wiring or if you are unsure about any part of the process, consider consulting a professional mechanic or the manufacturer's support team for guidance.
To wire a 14-pin Mercury control box, you will need the following tools:
Wiring Diagram: A detailed wiring diagram specific to your Mercury control box model is essential for understanding the connections between the control box and other components in your boat's electrical system.
Wire Connectors or Spade Terminals: These are used to secure the connections between the wires and the control box. Ensure that the connectors or terminals match the wire sizes and are compatible with the control box's pin configuration.
Wire Strippers: These are used to strip the insulation from the ends of the wires, exposing the conductors for connection.
Multimeter (Optional): A multimeter can be useful for testing the electrical connections and ensuring that the wiring is correct.
Pliers or Wire Pliers: These are used to bend and shape the wires as needed during the installation process.
Tape or Cable Ties: These are used to secure the wiring harnesses and prevent them from getting damaged or tangled.
Safety Goggles and Gloves: These are essential for protecting yourself from electrical shock and other hazards while working with electrical systems.
A Clean and Well-Lit Workspace: A clean and well-lit workspace is crucial for ensuring that you can see and work on the wiring connections accurately.
A Mercury Control Box Manual (Optional): Having a manual specific to your Mercury control box model can be helpful in understanding the specific wiring configuration and troubleshooting any issues that may arise.
Professional Assistance (Optional): If you are not comfortable with electrical wiring or if you are unsure about any part of the process, consider consulting a professional mechanic or the manufacturer's support team for guidance.
where can i buy the tools needed to wire a pin mercury control box
#EANF#As you conclude your journey through the intricacies of wiring a 14-pin Mercury control box, we hope that this article has provided you with a comprehensive guide to ensure a successful installation. Remember that understanding the specific wiring configuration and its role in controlling various functions of your vehicle's electrical system is crucial for optimal performance and preventing potential issues. By following the steps outlined in this article, you should now be equipped to troubleshoot or repair your vehicle's electrical system with confidence. If you have any further questions or concerns, please don't hesitate to reach out to the manufacturer's support team or consult a professional mechanic for guidance.
Before you go, we would like to emphasize the importance of proper installation and maintenance of your Mercury control box. A well-wired control box is essential for ensuring the smooth operation of your boat's electrical system, and neglecting this crucial step can lead to costly repairs or even safety hazards. By following the guidelines provided in this article and keeping your control box in good condition, you can rest assured that your boat's electrical system will continue to function efficiently and reliably. Remember to always refer to the manufacturer's instructions and consult a professional if you are unsure about any part of the process. We wish you a safe and enjoyable boating experience, and we hope that this article has been informative and helpful in your journey to master the art of wiring a 14-pin Mercury control box.


No comments:
Post a Comment